MDDN 241

MDDN 243

CCDN 271

CCDN 231

Showing posts with label development. Show all posts

Tuesday, 11 June 2013

MDDN 241

Project 2B

Production


My room is complete and finalised and ready for animating. I'm really happy with the way it turned out, especially this screenshot of the room whilst its in its "other" form. The purple will slowly change and begin to decay to this more evil red and black wallpaper in one of the scenes, showcasing the work of the evil Samantha. Now to start animating with the Bear inside. 


MDDN 241

Project 2B

Production


The next thing I needed was to add Samantha into the picture. As you can see in the picture, she's just there chilling outside the window from her room it's no biggie, but this angle will be in one of my scenes as the bear will be to the right of the screen staring to the left. She is currently inside a little box so I can play around with the lighting much easier for the lightning. Now I need to make another texture for the wallpaper, which is the evil side.


Monday, 10 June 2013

MDDN 241

Project 2B

Production


Since it was a girl's room, I thought I'd give it some colour instead of it being plain and simple. So I chose this nice tint of purple for the wallpaper, and a nice choice of a wooden floor to keep the room contrasted. Plus it looks quite good this way, I'm happy with how it turned out. The next thing I needed to do for one of my scenes is to make the door, which wasn't too hard at all. Plain door with the same wooden texture as my floor. I've also added a door sign just like the one on my storyboard from the previous project, which has "Samantha's Room" written on it. 


Sunday, 9 June 2013

MDDN 241

Project 2B

Production


Skipping ahead a little bit from my last post, I figured it'd be boring if I kept posting pictures up of furniture that I was building one by one. But this is my bedroom at the moment. As you can see there are now shelves above the bed, a big book shelf on the right hand side of the room and then a desk on the left. Oh, and it is all also textured to my liking. I used the same wooden cartoon texture for most of it because it looks good altogether. I'm happy with how it is coming along. I just need to do the walls next and the ground texture.


Thursday, 6 June 2013

MDDN 241

Project 2B

Production


Here is a quick render of my progress so far, who knew making bedroom furniture would take so long to do. Easy, but time consuming. So far I've got the bed, headboard and base, and 2 sets of drawers that open and close like I have shown at the bottom. It's coming along nicely, it'll look much better once I've textured it too.


MDDN 241

Project 2B

Production


One thing I had to think about was a light source for the bedroom, so I quickly made and added a lamp. Nothing special about it, very dim but still lights up the room quite well, I also tried rendering it with a red light source as well, but might be difficult to work with later on in the future. The bottom image also captures the window that I have carved out of the wall, which will play part in one of the scenes from my storyboard.


Tuesday, 4 June 2013

MDDN 241

Project 2B

Production


For my animation, my environment will be set inside a bedroom. This environment should be pretty easy to make as all I'd have to construct is the interior of the room, with such objects like the bed and drawers etc. It'll be a plain layout just like I have made here at the bottom, with the bed base starting to come out.


Wednesday, 22 May 2013

MDDN 241

Project 2B

Production

After sending my files to Maya and adding it's skeleton, I played around with the textures a little with my character and came up with this render which looks like the type of thing that I'm looking for. Like I said in the previous post, we won't be seeing her details too much just little glimpses of her so this is perfect. Her skin is blood stained and the dress looks older and ragged more than before. There is only one thing left to do with my character and that is to add it's hair which will cover a majority of her body.


Tuesday, 21 May 2013

MDDN 241

Project 2B

Production

I'm not too sure if I needed to or not but I added a skeleton to my character just incase I wanted her to move around in my animation. I haven't quite decided at this point but it'll be good to have one for her just incase.


MDDN 241

Project 2B

Production

After I finished sculpturing my character on Mudbox, I added a dress to her so she has some form of personality. The dress I found an important part of the character because it defines what kind of character she is, and the material and texturing I'll add to it in the end will definitely help. It's an old style dress which I also changed and sculpted to cater to her body. It also looks like a dress that a scary little girl would wear like such characters from the games Fear. I sculpted the face of the character a little bit but I won't be completely showing her so she'll just be a silhouette.


Monday, 20 May 2013

MDDN 241

Project 2B

Production

Skipping ahead a little bit, I decided to make my second character that will be used in the background of my animation. Sam's a little girl who needs to be scary and small and petite. So I opened up mudbox and started working on the female template/base and eventually created this model here below. 


Thursday, 9 May 2013

MDDN 241

Project 2B

Production

Leading on from the previous project, it's time to take what we've created and take it to the next level and animate it. When I made my character and put it on the turntable, I didn't want to have a static model of the character. I wanted to make it move. So in my turntable I made my evil bear breathe by moving it's chest, I made his mini gun spin furiously and the wind up key attached behind it wind. The next step I did was to add a skeleton to my character for the last project. I put the first joint on the bear's neck and lead all the other joints from there. This was an easy character to add a skeleton to and I got it done quickly.


Thursday, 18 April 2013

MDDN 241

Project 2A
Pre-production


Orthographic Sketch Final

So, this is my final sketch model of my character! I added a little bit of rendering to it to give it more of an effect, plus it looks a whole lot better. I hand drew the bear yes, then put it through photoshop to fix up anything that I could, and finally coloured it using my SketchBook Pro on my iPad which turned out quite well. If you're wondering why I've got the mug shot style photo of him, well let's just say he's not your normal everyday teddy bear. With creating this character I had to combine 3 inanimate objects that have the 3 qualities which are "Materiality", "Motion" and "Meaning". I decided on the meaning of it first which I thought would be easier on the other 2 to decide. As weird as it sounds, I went with the "Not-so-cuddly" teddy bear. I didn't not want to have a normal teddy because that would be too much of a cliche, so I went with the opposite and made him evil. The colour choices I have made this possible due to the darkness of it, with it's facial expression giving it that extra edge. For materiality I chose actual animal skin for it instead of cotton. Why not cotton you ask? Well it would make sense for my bear to do the opposite of what it's originally made out of since it is an evil bear, and you don't normally see a teddy bear made out of animal skin. This will be handy because I can add fur to my final render as well when I get to that stage. Lastly for movement, I went with your basic wind up key. Although it's an evil bear and it looks like its locked and reloaded ready for destruction, its still a wind up toy! How clever is that? I'm excited to see how this goes on maya when I'm modelling it.


Friday, 5 April 2013

MDDN 241

Project 1
Materiality

Poster

This is the A3 poster as part of our hand-in. We were required to make a poster that shows 3 different stages of our form and a brief description of it, also explaining where we got our ideas and inspiration from.


Monday, 1 April 2013

MDDN 241

Project 1
Materiality

Final Stages

Another little tweak and change that I made was the colour of the final model. The spikes are now a nice shade of red implying that this used to be the old planet, but now it is controlled by some random infection. The red spikes have moving textures which add a cool little effect to the whole thing as such. 


MDDN 241

Project 1
Materiality

Development


This is a screenshot of one of my final moments before I am to render my animation. As you can see, we have the final textures of each of the objects in the shot. We have to light sources which are the red arrows and which way that light source is facing. And the camera angle, which is the exact same as the screenshot. With the camera work, It's going to start off in this position, then slowly zoom in until the object is about to explode. It then pans around the whole object whilst the spikes are coming out of the dead infected planet.


MDDN 241

Project 1
Materiality

Development


One thing that I have almost forgotten was the background image that I was going to use in my animation. It would have to be a deep space background since it is a planet, so it wasn't too hard to find. The image below is the one I will use which looks pretty good afterwards. It is plain and simple, plus I can add effects to it later on once I animation it.


Saturday, 30 March 2013

MDDN 241

Project 1
Materiality

Development


This is what the final product that I have come up with so far, and it is looking pretty cool! I like the blend of 2 colours within this form and they really do contrast each other. Also the angles that I have put the spikes I would have to say do work quite well in the end. I will have to look at what the images look like after they have been rendered, maybe a little light tweaking might be done.


MDDN 241

Project 1
Materiality

Development


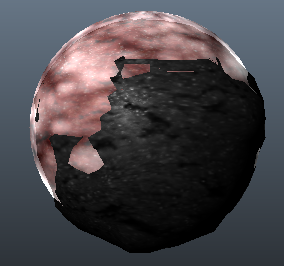
These 2 images show the textures that I have added onto the little rocks at the beginning of the animation and what colour and texture it turns up at the very end as well. I went for a more dark shade here just so the whole thing now looks dead. The once alive planet has turned black, where the spikes are the only things that are actually now "living". I am liking the colours I chose with these but they look a lot different when rendered and there is still lighting to be added, so no doubt this will change some things to a degree.


MDDN 241


Project 1
Materiality

Development


I changed up a part of the frames a little with this scene. The part where the rock becomes dead and then transparent where the inner object starts expanding is now a little different. The old planet grows smoke cloud around it, then slowly turns transparent like the example below. The inner rock now shows up and explodes out of the dead planet.